
Pygers Workshop Notes - Week 3 (Fall 2020)
What is BIDS? Why do we use it?
The Brain Imaging Data Structure, or BIDS, is a standardized way of organizing and describing neuroimaging datasets. This helps to make data accessible and usable by different researchers over time. BIDS also standardizes metadata (i.e. the details of the task or imaging protocol) in a machine-readable way to promote automated analysis workflows, which enhances reproducibility and efficiency. When your data are in BIDS format, you can also use BIDS apps (e.g. the BIDS validator to verify the consistency and completeness of your dataset, fMRIPrep to preprocess your MRI data, and MRIQC for data quality assurance).
ReproIn: Setting yourself up for success
The easiest way to get started on the BIDS path is to setup your program card on the scanner (prior to data acquisition!) following the ReproIn heuristic. This is something that will take you 30 min or less to do, and will make your life infinitely easier going forward. When you follow the ReproIn heuristic on your program card, you will be able to use HeuDiConv later on to automatically convert your raw data off the scanner to BIDS format and add it to your BIDS dataset.
If you have already acquired data that does not follow the ReproIn heuristic, don’t despair! You can still “manually” convert your data to the BIDS standard. However, this does take more effort than using HeuDiConv, so if you have not yet acquired data, you should definitely setup your program card using the ReproIn heuristic.
This is an example of how I have my program card set up:
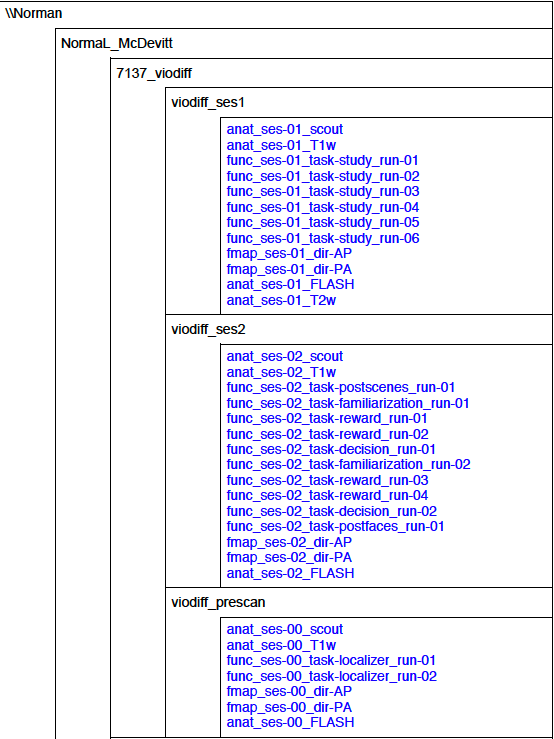
DICOM and NIfTI formats
Your data comes off the scanner in DICOM format (DICOM = Digital Imaging and Communications in Medicine). There is one DICOM file for every volume of data collected (e.g. one DICOM for each TR).
At PNI, data from the scanner is transferred to a directory on jukebox called ‘conquest’. The full path to conquest is /jukebox/dicom/conquest.
# take a look around conquest
$ cd /jukebox/dicom/conquest
$ ls
$ cd Skyra-AWP45031/NormaL/2020/
$ ls #RIP scanning in 2020

# for our sample data, we have made a "fake" conquest directory
$ cd /jukebox/norman/pygers/conquest/
$ ls
$ cd 0219191_mystudy-0219-1114/dcm
$ ls
The important thing to remember about DICOM files is they contain identifying information about the subject!! e.g. date and time of the scan and birthdate. In other words, you probably do not want to share DICOM files publicly unless you have specific permission to do so (or have removed identifying information from the headers).
# you can use AFNI to read dicom header information
# NOTE: your dicoms need to be unzipped first (we will do this in the step1_preproc step below)
$ module load afni
$ dicom_hdr FILENAME.dcm
You can also use Matlab to read DICOM header information, but we are not going to do that today. From the Matlab command line:
>> info = dicominfo('FILENAME.dcm');
You most likely will want to work with your data in NIfTI file format (NIfTI = Neuroimaging Informatics Technology Initiative). NIfTI essentially concatenates your DICOM files to make one 3D or 4D file per scan. The first three dimensions define the three spatial dimensions (x, y, and z), and the fourth dimension is time. For example, anatomical scans typically have the three spatial dimensions only, whereas functional scans will have four dimensions (i.e. 3D spatial information captured at multiple timepoints).
# you can use AFNI to read NIfTI header information
$ nifti_tool -disp_hdr -infiles FILENAME.nii.gz

# you can also use FSL
$ module load fsl
$ fslhd FILENAME.nii.gz #full header information
$ fslinfo FILENAME.nii.gz #abbreviated header information
Some maintenance steps
Before we move on, let’s revisit some of what was covered in weeks 1 and 2 (conda, vim, aliases, git). We are going to install a new package in our conda environment, add a new alias to our .bashrc, update a few lines of code in our preprocessing scripts, and commit and push those changes to GitHub.
# update our conda environment and install the pydeface (and tmux) package(s)
$ conda update -n base -c defaults conda
$ conda activate pygers
$ pip install pydeface
$ conda install -c conda-forge tmux #you only need to install this package if you are working in a local (not PNI server) environment

# Make your life easier!
# add a conquest alias to .bashrc or .bash_profile
$ vim ~/.bashrc #if you are on the server
# vim ~/.bash_profile if you are on your local machine

# enter insert mode (i) and add the following:
# alias 'conquest'='ls /jukebox/norman/pygers/conquest'
# go back to command mode (esc)
# :x to save and exit

$ source .bashrc
$ conquest

# update the version of heudiconv in run_heudiconv.py
$ pygers #this is an alias to cd to your pygers_workshop directory!
$ cd sample_study/code/preprocessing
$ vim run_heudiconv.py

# enter insert mode (i) and update line 18:
# "/jukebox/hasson/singularity/heudiconv/heudiconv-v0.8.0.simg "
# go back to command mode (esc)
# :x to save and exit

# commit those changes using git
$ git status
$ git add run_heudiconv.py
$ git commit -m "update heudiconv version"

# remove module load pydeface from deface.sh
$ vim deface.sh

# enter insert mode (i) and update line 6:
# remove or comment out module load pydeface/2.0.0
# go back to command mode (esc)
# :x to save and exit

# commit and push changes using git
$ git status
$ git add deface.sh
$ git commit -m "remove module load pydeface"

# don't remove .heudiconv in step1_preproc.sh
$ vim step1_preproc.sh

# enter insert mode (i) and update line 61:
# remove or comment out rm -rf $bids_dir/.heudiconv
# go back to command mode (esc)
# :x to save and exit

# commit and push changes using git
$ git status
$ git add step1_preproc.sh
$ git commit -m "don't delete .heudiconv"
$ git status
$ git push -u origin master
Running HeuDiConv
HeuDiConv (i.e. the Heuristic DICOM Converter) is a package that we use to convert DICOM files to a BIDS-formatted dataset structure. HeuDiConv (1) uses dcm2niix under the hood to automatically convert your DICOM files to NIfTI, (2) places metadata for each scan into a .json sidecar file, (3) creates an empty events.tsv file for each functional scan (that you will eventually need to populate with information about your task events and timing), and (4) organizes all of these files following the BIDS directory structure.
Example BIDS directory structure based on the program card above:
├── bids
│   ├── CHANGES
│   ├── dataset_description.json
│   ├── derivatives
│   ├── participants.tsv
│   ├── README
│   ├── sub-101
│   │   ├── ses-00
│   │   │   ├── anat
│   │   │   │   ├── sub-101_ses-00_T1w.json
│   │   │   │   └── sub-101_ses-00_T1w.nii.gz
│   │   │   ├── fmap
│   │   │   │   ├── sub-101_ses-00_dir-AP_magnitude.json
│   │   │   │   ├── sub-101_ses-00_dir-AP_magnitude.nii.gz
│   │   │   │   ├── sub-101_ses-00_dir-PA_magnitude.json
│   │   │   │   └── sub-101_ses-00_dir-PA_magnitude.nii.gz
│   │   │   ├── func
│   │   │   │   ├── sub-101_ses-00_task-localizer_run-01_bold.json
│   │   │   │   ├── sub-101_ses-00_task-localizer_run-01_bold.nii.gz
│   │   │   │   ├── sub-101_ses-00_task-localizer_run-01_events.tsv
│   │   │   └── sub-101_ses-00_scans.tsv
│   │   ├── ses-01
│   │   │   ├── anat
│   │   │   │   ├── sub-101_ses-01_T1w.json
│   │   │   │   └── sub-101_ses-01_T1w.nii.gz
│   │   │   ├── fmap
│   │   │   │   ├── sub-101_ses-01_dir-AP_magnitude.json
│   │   │   │   ├── sub-101_ses-01_dir-AP_magnitude.nii.gz
│   │   │   │   ├── sub-101_ses-01_dir-PA_magnitude.json
│   │   │   │   └── sub-101_ses-01_dir-PA_magnitude.nii.gz
│   │   │   ├── func
│   │   │   │   ├── sub-101_ses-01_task-study_run-01_bold.json
│   │   │   │   ├── sub-101_ses-01_task-study_run-01_bold.nii.gz
│   │   │   │   ├── sub-101_ses-01_task-study_run-01_events.tsv
│   │   │   └── sub-101_ses-01_scans.tsv
│   │   └── ses-02
│   │       ├── anat
│   │       │   ├── sub-101_ses-02_T1w.json
│   │       │   ├── sub-101_ses-02_T1w.nii.gz
│   │       │   ├── sub-101_ses-02_T2w.json
│   │       │   └── sub-101_ses-02_T2w.nii.gz
│   │       ├── fmap
│   │       │   ├── sub-101_ses-02_dir-AP_magnitude.json
│   │       │   ├── sub-101_ses-02_dir-AP_magnitude.nii.gz
│   │       │   ├── sub-101_ses-02_dir-PA_magnitude.json
│   │       │   └── sub-101_ses-02_dir-PA_magnitude.nii.gz
│   │       ├── func
│   │       │   ├── sub-101_ses-02_task-postscenes_run-01_bold.json
│   │       │   ├── sub-101_ses-02_task-postscenes_run-01_bold.nii.gz
│   │       │   ├── sub-101_ses-02_task-postscenes_run-01_events.tsv
│   │       └── sub-101_ses-02_scans.tsv
│   ├── task-decision_bold.json
│   ├── task-familiarization_bold.json
│   ├── task-localizer_bold.json
│   └── task-postfaces_bold.json
│   └── task-postscenes_bold.json
│   └── task-reward_bold.json
│   └── task-study_bold.json
There are a few steps that need to be taken before we can run HeuDiConv. We have packaged these steps into a script called step1_preproc.sh. There is detailed documentation of the step1_preproc.sh script on our Converting data to BIDS using HeuDiConv handbook page. In short, step1_preproc.sh does five things for you:
copies your DICOM files from conquest and place them in your study directory (in /data/dicom)
counts the number of volumes in each run so you can double check that your data transfer was successful
unzips the DICOMs in your study directory
runs HeuDiConv to convert your DICOMs (.dcm) to BIDS-formatted NIfTI files (.nii)
defaces your T1w anatomical image and set it aside in your derivatives directory (in /data/bids/derivatives/deface)
You can run step1_preproc.sh as soon as your data have finished transferring from the scanner to conquest. I typically finish my last scan, start the data transfer to conquest, and by the time I have wrapped up with the participant and cleaned up at the scanner, my data transfer has finished. I then begin running step1_preproc.sh and my data are available in NIfTI format in my study directory approximately 30 min later!
We recommend running the step1_preproc.sh script in a tmux window. Tmux is a way to create a persistent server session, which means that if I close my laptop or lose connection to the server, the script will keep running uninterrupted. In the scenario above, this is really useful because I can begin running step1_preproc.sh before I leave the scanner room, then I can close my laptop and walk back to my office, go get lunch, etc. and the script will keep running. Be sure to checkout our handbook guide to using tmux.
# create a tmux session called heudiconv
$ tmux new -s heudiconv

# practice using tmux:
# detach using ctrl+b, d
# attach to an existing session
$ tmux a -t heudiconv

# in your tmux window, make sure you are in your code/preprocessing directory
$ pwd

# activate your conda environment in your tmux session!
$ conda activate pygers

# get the name of the conquest directory that contains the dicom files you want to convert
$ conquest #using our alias!

# run step1_preproc.sh with 3 inputs:
# (1) subject ID -- this is how you want this subject listed in your BIDS directory
# (2) session ID -- this should match how your runs were named on the scanner console
# (3) conquest directory -- the name of the folder that contains your DICOM files for this subject, this session

$ ./step1_preproc.sh 001 01 0219191_mystudy-0219-1114
We can let HeuDiConv run in our tmux session and next week we will explore the output of HeuDiConv!